PBR Brake Install on Merkur XR4Ti
 |
After learning from Philip Chadwick, a.k.a. "Socal Phil" that there might be a better, cooler brake upgrade out there for the XR4Ti, I started looking into it. PBR is an Australian Brake company which makes brakes that appear on a lot of cars now. Looks like Mustangs, Aleros, Corvettes (I think) and others. These are really nice pieces and are aluminum. They are physically larger than the Merkur brakes, much larger. They use the same type of mounting brackets, so you will want to pick up a set of front brake adapters from David Godfrey. The ones that you see in my installation have been polished. I do not have any idea how long they will look as nice as they do. I think that these are the same as the Bullitt and Cobra brakes, it just looks like they come with some lettering cast in them. Perhaps the same is true for the Baer brakes as well. |
|||
 |
||||
 |
||||
Gathering the pieces.First, I got some calipers. I chose some used dual piston aluminum calipers (there are some single piston calipers out there from earlier years, the dual pistons are superior, I suppose.) I bought mine on eBay. They came with pads, stock used hoses, and the little sheet metal piece that bolted to the mustang body to secure the end of the hose. This was used by me and is an important piece (ford part number 2Ao-56 $10.28 ea. but clip is NLA.) In addition, I needed a set of Ford Countour SVT front rotors, 11" nominal outside diameter. A good source for the Contour Rotors is the Complete Brake Service (1-800-581-4888)where I paid $108 for the pair, delivered. They were likely Brembo rotors. I am also a big fan of speed bleeders. The size required is the 10mmx1.0mmx37mm bleeder. These are now available at many chain autoparts places (Autozone, Napa, O'Rileys) in their help section and they cost around $10. The 10mmx1.0x30mm are too short !! Like I said above, I reused the stock pads and hoses that came with it.
The hoses that come with the PBR brakes are kind of funny. They are SAE sized fittings, not metric. That's fine, but they are different between the driver's and passenger's sides. Strange, I thought. I decided to have some replacement hard lines made. This way, the adapting is taken care of, and I just replace two short pieces of steel line with two other short pieces of steel line. No big deal. If this idea frightens you, turn back now! I decided to modify the car to accept the Mustang brakes, this way, in the future, if I wish to buy new pads or hoses, I can simply order them for the Mustang, and leave the Merkur out of the equation.
The end of the metric line on the XR ends with a rigid mount at the body. This is a good design and I chose to keep it. The PBR brakes have a different (beefier) hose end, with a locating finger in the bore that indexes a groove in the brake hose. I first put the mustang clip in the vise an pounded it with a hammer. I painted it afterwards. Below are before and after pics of the hammering operation.


Anyways, the idea is to remove the Merkur hard line (not pictured) and then trim the sheet metal "holder" on the body. I cut off the xr mount to provide clearance since the new hose would go right here. (I could have reproduced the right diameter hole, but the locating tab (finger) on the mustang clip would have tough to reproduce correctly.) I cut it with my dremel tool. No room to get in with a hack saw. This can be seen below.


Next, I drilled a hole into the sturdy metal behind the "brake line holder." This will mount the Mustang brake line holding clip to the XR body. I painted the end of the cut and the drilled hole with black paint, then mounted the new mustang brake line holding clip. I used an extra 8mm bolt that I had, with a stainless steel nut and some blue locktite. Its VERY sturdy and won't be coming off soon. It is probably stiffer than the original when mounted like I have done.


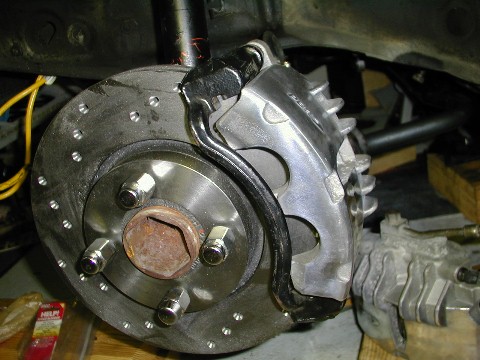
Next, I mounted the adapter plate (two bolts) the rotor (slides on) and the caliper. Note that in the photos below, the caliper has no pads and is really just mocked up. I crossdrilled my rotors and decided to have them cadmium plated so that they will not rust and look nasty. Therefore the rotors and calipers have to come off again, so why put pads on it ? I fitted the PBR hose to the mustang mount (factory fit, so the pieces are perfect) and then fitted the new hard line from the master cylinder.


Passenger side is a mirror of the drivers side.
I took the stock SVT contour rotors and laid out a pattern in autocad. I used my dad's milling machine and rotary table to drill my rotors. This was really entirely for looks. If they run cooler, last longer, shed water, or let gas out, well that's a freebee. I did it for looks.

After doing this machining work, I decided to get the rotors cad-plated. This will set me back a little while (and about $50 for four rotors) but the car isn't going anywhere soon, so what the heck. Hopefully it keeps them from getting surface rust on them.After the cad plating, I will mount the rotors and pads, then fill the system with fresh brake fluid and bleed the brakes. I love speed bleeders, since they almost make bleeding the brakes fun. Each is a little check valve that screws into the caliper in place of the stock bleeder screw. They seat tight when not used. To bleed the brakes, you loosen the bleeder, put a hose over the end, and then hop in and pump the pedals. Its a one man job, and the check valve keeps air from going back up into the system. I love them. Its probably good practice to change brake fluid once a year. Cheap too.